
Learn how to touch type
Touch typing is all about the idea that each finger has its own area on the keyboard. Thanks to that fact you can type without looking at the keys. Practice regularly and your fingers will learn their location on the keyboard through muscle memory.


Sitting posture for typing
- Sit straight and remember to keep your back straight.
- Keep your elbows bent at the right angle.
- Face the screen with your head slightly tilted forward.
- Keep at least 45 - 70 cm of distance between your eyes and the screen.
- Еxpose the shoulder, arm, and wrist muscles to the least possible strain. The wrists can touch the tabletop in front of the keyboard. Never shift your body weight to the wrists by resting on them.
Home row position
Curve your fingers a little and put them on the ASDF and JKL; keys which are located in the middle row of the letter keys. This row is called HOME ROW because you always start from these keys and always return to them.
F and J keys under your index fingers should have a raised line on them to aide in finding these keys without looking.
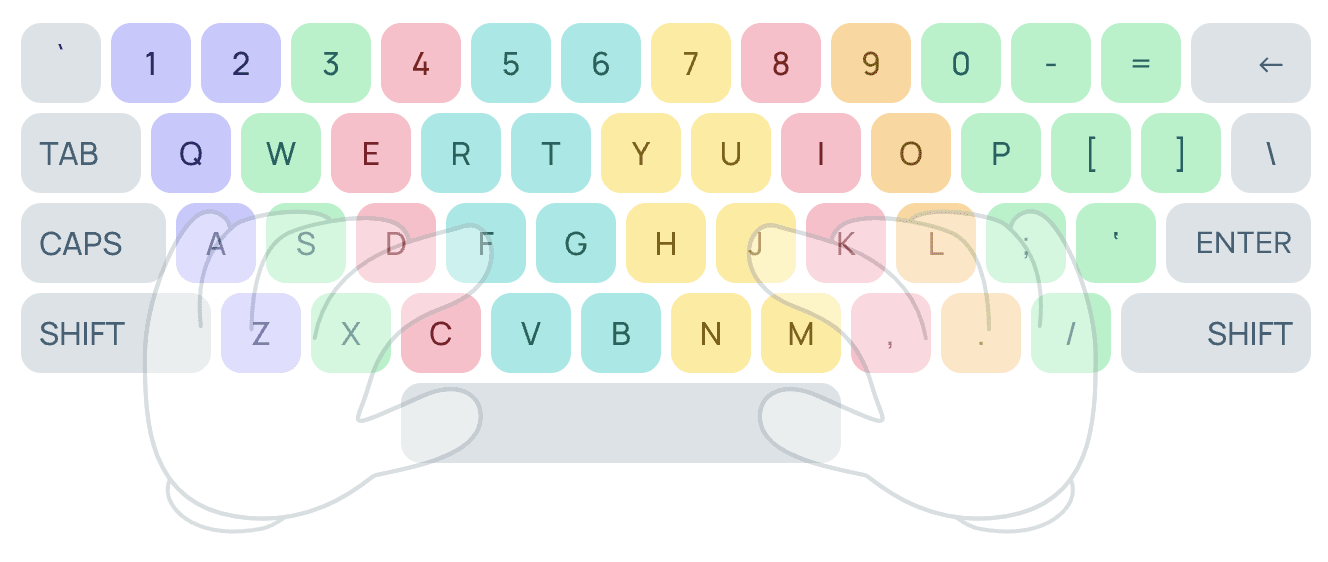
Keyboard scheme


The color-coded keyboard under lesson input field will help you to understand which finger should press each key.
- Hit keys only with the fingers for which they have been reserved.
- Always return to the starting position of the fingers "ASDF – JKL;".
- Establish and maintain a rhythm while typing. Your keystrokes should come at equal intervals.
- When typing, imagine the location of the symbol on the keyboard.
- The SHIFT key is always pressed by the pinky finger opposite to the one hitting the other key.
- Use the thumb of whichever hand is more convenient for you to press the Space bar.
This method may seem inconvenient at first, but do not stop, eventually, you'll find out that you are typing quickly, easily, and conveniently. To achieve the maximum result, choose a touch typing course for your keyboard layout and in the desired language.

Fingers motion
Don't look at the keys when you type. Just slide your fingers around until they find the home row marking.
Limit your hand and finger movement only to what is necessary to press a specific key. Keep your hands and fingers close to the base position. This improves typing speed and reduces stress on the hands.
Pay attention to ring fingers and little fingers, since they are considerably underdeveloped.

Typing speed
- Do not rush when you just started learning. Speed up only when your fingers hit the right keys out of habit.
- Take your time when typing to avoid mistakes. The speed will pick up as you progress.
- Always scan the text a word or two in advance.
- If you're having trouble typing, use a keyboard test to determine if it's a software or hardware issue.
- Pass all typing lessons at Ratatype. It will help you to get above the average typing speed.

Take care of yourself
Take a break if you feel that you get distracted easily and are making a lot of mistakes. It is more productive to come back when you feel refreshed.
It's time to get some practice
Popular questions and typing tips
-
It's very easy, the main thing is to follow a few basic tips.
- Correct posture while typing; sit upright with your screen at eye level, at a distance of 45-70 cm. Keep your back straight, bend your elbows at a right angle, and relax the muscles of the shoulders, arms, and hands.
- Always start typing with the ASDF JKL: keys (this line is called the main line) and return your fingers to the same position.
- Hit keys only with the fingers for which they have been reserved. Our colour scheme will help you with this.
- The SHIFT key is always pressed by the pinky finger opposite to the one hitting the other key. Use the thumb of whichever hand is more convenient for you to press the Space bar.
- Don't look at the keys when you type. Just slide your fingers around until they find the home row marking. Limit your hand and finger movement only to what is necessary to press a specific key. Keep your hands and fingers close to the base position.
- Speed up only when your fingers hit the right keys out of habit.
-
The main thing is to practice a lot and regularly. Your muscle memory will improve with each lesson you take, and all ten fingers will know what and where to press the keyboard.

Exercise for only 15-30 minutes a day and in a few weeks, you will know the exact location of each key without even looking at the keyboard. But remember, it is important to learn correctly. If you fail to learn the correct positions, you will simply waste your time.
Don't forget to check your progress from time to time — just take a typing test.
-
Ten-finger typing is the idea that each finger has its own area on the keyboard. Thanks to this, you can type faster and without looking at the keys.
It is essential to press the keys only with the finger that is designed for them. The color-coded keyboard under the lesson input field will help you to understand which finger should press each key.
-
With Ratatype you can learn the technique of touch typing with all fingers. The technique is the idea that each finger has its own area on the keyboard. Thanks to this, you can type without looking at the keys.
Our research shows that you can type up to 20% faster with this method. You can read more about this technique in our article on touch typing.
Practice continuously. Take a break if you feel that you get distracted easily and make a lot of mistakes. It is more productive to come back when you feel refreshed.
-

The key to the success of any activity is regular exercise. As soon as you miss a lesson, you lose the time that you have already spent learning the previous ones. Therefore, try to set aside 2-4 weeks for regular training every day for 30 minutes.
-
Mastering the skill of typing fast doesn’t happen overnight. To increase your typing speed and accuracy, you’ll need to practice typing regularly and use exercises that focus on different aspects of the skill. The frequency with which you practice will depend on your individual goals, how well you’ve already mastered typing, and the time you have available.
The frequency with which you practice typing exercises will depend on your current level of proficiency. If you're just starting out, then regular, short practice sessions would be recommended in order to build up your speed and accuracy. If you're already proficient, then you may only need to practice occasionally to maintain your skills. Ideally, you should aim for a minimum of 10 minutes of typing practice a few times a week.

As with anything, regularity is the key to success. Strengthening muscle memory takes a lot of practice, and it is important that you exercise regularly. Exercising 15–30 minutes daily will be more helpful than two-hour workouts once a week. It is easier to maintain concentration during short typing exercises, as well as being much easier to carve out time for them.
Practice typing whenever possible, and not just with the Ratatype. Try to practice your touch typing skills while communicating on social media or when performing less urgent work tasks.
Whether you’re a beginner or an expert typist, how much practice you need and how often you should practice will vary depending on individual goals. Beginners should practice at least two to three times a week, and experienced typists should strive to practice four to five times each week to become proficient. No matter the skill level, regularly scheduled and focused practice sessions will lead to a better and faster typing experience.
Typing test is also a practice. Take the test from time to time to see how much your speed has improved.
-

You cannot learn touch typing if you constantly glance at the keyboard. Try to remember the location of the symbols on the keyboard (our first 4 lessons teach just that).
It may seem too slow at first, but gradually, your typing speed will increase. The next 4 lessons will reinforce this result. Go through the first 8 keyboard typing lessons, achieve all the rewards, and in a few weeks, you won't even remember that you typed differently.
Psst! Don’t forget to try the game mode, learning can be fun! It’s even better in a class — study together, compete, and improve your skills. Classes work great for teachers too!


